What You Will Learn
In this tutorial we will serve protobuf to an application over HTTP (or HTTP2 for performance).
Our goal will be to take sensor data from a specific type of machine, serialize that data with protobuf, and then hand that off to our frontend via a REST API. Disclaimer: protobuf is usually used as part of a gRPC API.
What Is Protobuf?
Protobuf is shorthand for Protocol Buffers. Protocol Buffers are a typed system for serializing data, similar to XML or JSON. Unlike XML, protobuf is very small, and unlike JSON, the data sent via protobuf can be typed as opposed to being a string by default. In many cases this means that messages with protobuf payloads are more lightweight and faster in practice than messages with comparable JSON payloads.
Dependencies
First we create a Gradle project with our dependencies (→ Tutorial).
We will be using Javalin for our web-server, slf4j for logging, and protobuf for data serialization:
dependencies {
    implementation 'org.slf4j:slf4j-simple:1.8.0-beta4'
    implementation 'io.javalin:javalin:6.7.0'
    implementation 'com.fasterxml.jackson.core:jackson-databind:2.13.2'
    implementation 'com.google.protobuf:protobuf-java:3.19.6'
}
Other Setup
This tutorial assumes you will be using the Gradle build tool in order to build your project. Without Gradle you can alternatively use the build scripts provided in the sample repository to automate some of the build process, however these tools aren’t as feature rich or robust as the Gradle plugin covered here. The Gradle plugin is built and maintained by Google.
To see all of this code in action and skip the tutorial, you can alternatively clone the repository here.
Application Structure
The Javalin application is fairly simple however we will both generate and utilize Protobuf within the same scope of work. Some best practices recommend creating a separate directory structure for generated files. When working in my IDE I noticed that by keeping the files separate, I could mark the “gen” folder as a “generated sources root”, which prompts the IDE to warn you if you are editing a file that could be potentially regenerated at a later time.
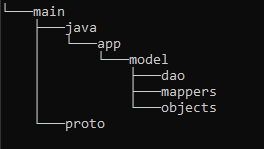
Let’s start by building our project structure. Here’s a quick directory tree. Go ahead and add these directories under ‘src’ in your project.
The Data
Now that we have our directory structure, let’s dive right in and create our first plain ole’ Java object (POJO). This will represent our sensor data that we wish to read from either a database or the machinery itself.
In the objects directory go ahead and create a SensorData class like so…
package app.model.objects;

import java.sql.Timestamp;
import java.util.List;

public class SensorData implements Serializable {

    private String makeAndModel;
    private int destinationYear;
    private List<Double> fluxCapacitorReadings;
    private Timestamp lastCheckIn;
    private boolean safetyBeltsOn;

    public String getMakeAndModel() { return makeAndModel; }
    public void setMakeAndModel(String makeAndModel) { this.makeAndModel = makeAndModel; }

    public List<Double> getFluxCapacitorReadings() { return fluxCapacitorReadings; }
    public void setFluxCapacitorReadings(List<Double> fluxCapacitorReadings) { this.fluxCapacitorReadings = fluxCapacitorReadings; }

    public int getDestinationYear() { return destinationYear; }
    public void setDestinationYear(int destinationYear) { this.destinationYear = destinationYear; }

    public Timestamp getLastCheckIn() { return lastCheckIn; }
    public void setLastCheckIn(Timestamp lastCheckIn) { this.lastCheckIn = lastCheckIn; }

    public boolean isSafetyBeltsOn() { return safetyBeltsOn; }
    public void setSafetyBeltsOn(boolean safetyBeltsOn) { this.safetyBeltsOn = safetyBeltsOn; }

}
Perfect! Now we have a model to represent our SensorData. In this case, we also implemented the Serializable interface as a good practice to ensure compatibility with whatever JSON serializer we choose to use in the future.
Now let’s pop on over to our DAO directory and add a quick FakeDAO class so that we can emulate data coming from a database in the form of a POJO. This is typically how data would be mapped from a database, so we’ll represent that here.
package app.model.dao;

import app.model.objects.SensorData;

import java.sql.Timestamp;
import java.util.List;

public class FakeDao {

    public FakeDao(){}

    public SensorData getSensorDataFromVehicleDB(){
        SensorData data = new SensorData();
        data.setMakeAndModel("DMC, DeLorean");
        data.setDestinationYear(2035);
        data.setFluxCapacitorReadings(List.of(37456.3245, 3453.3454, 348765.2343));
        data.setLastCheckIn(new Timestamp(System.currentTimeMillis()));
        data.setSafetyBeltsOn(true);
        return data;
    }

}
The .proto File
Now that we have a POJO representation of our SensorData, let’s go ahead and create our first .proto file. Proto files are used to describe a protocol buffer. After we write our .proto file, we will use it to generate corresponding Java code. Note that you could use this same .proto file in your frontend to generate JavaScript or Dart code, etc.
syntax = "proto3";
// The package directive (when generating Java src files) tells protoc where to store the generated Java files
package protos;

import "google/protobuf/timestamp.proto";

// proto standard says field names should be lower_snake_case
// except enum values (not covered here) which should be SCREAMING_SNAKE_CASE

message SensorData {
    optional string make_and_model = 1;
    int32 destination_year = 2;
    repeated double flux_capacitor_readings = 3;
    optional google.protobuf.Timestamp last_check_in = 4;
    bool safety_belts_on = 5;
}
Anatomy of a .proto File
There’s a lot going on in the short code snippet above, so let’s cover just the basics, shall we?
- The above document uses the latest (at time of writing) proto3 syntax.
- The message keyword denotes a complex object we wish to represent. You can have multiple messages per proto file or just one.
- Every field in a .proto file is denoted by a positive integer value. For the sake of saving memory it’s best to start with the lowest number possible (1) and work sequentially.
- The protobuf spec defines several primitive data types, you can see examples of them above including int32, double, bool, etc.
- To denote that a field could be omitted or “null” it’s best to use the optional keyword. In our example, last_check_in and make_and_model can be null.
- Protos can be imported for use inside more complex protos. In this instance, timestamp requires a proto definition and our SensorData proto makes use of that definition.
- List types can be denoted using the repeated keyword
- gRPC API methods can be defined with the service keyword (outside the scope of this tutorial)
With those basics in mind, let’s move on to generating our first Java class from a proto.
Configuring the Gradle Protobuf Plugin
Now wait just one minute! Why are we creating a redundant Java class when we just created one only moments ago? Let’s talk about what’s happening here. We’re about to generate Java code to represent our proto. However, this generated code is not meant to be edited. This means creating helper functions in the generated code is discouraged. In fact extending the generated code in any way is really inadvisable. This is because, if the schema were to change, first the proto file would need updated, then protoc would compile a new generated class, thereby undoing any work that might have been done inside that class. For this reason and others, we instead use the generated code for what it is, a means of serializing and representing an existing class.
buildscript {
    repositories {
        mavenCentral()
    }
    dependencies {
        classpath 'com.google.protobuf:protobuf-gradle-plugin:0.8.18'
    }
}

plugins {
    id "com.google.protobuf" version "0.8.18"
    id 'java'
}

repositories {
    mavenCentral()
}

dependencies {
    implementation 'org.slf4j:slf4j-simple:1.8.0-beta4'
    implementation 'io.javalin:javalin:6.7.0'
    implementation 'com.fasterxml.jackson.core:jackson-databind:2.13.2'
    implementation 'com.google.protobuf:protobuf-java:3.19.6'
}

sourceSets {
    main {
        proto {
            srcDir "src/main/proto"
        }
        java {
            srcDirs "src/main/java", "gen/main/java"
        }
    }
}

group = 'tech.gmork'
version = '1.0-SNAPSHOT'
description = 'serving-protobuf-with-javalin'

rootProject.tasks.named("processResources") {
    duplicatesStrategy = 'include'
}

protobuf {
    // Configure the protoc executable
    protoc {
        // Download from repositories
        artifact = 'com.google.protobuf:protoc:3.19.6'
    }

    generateProtoTasks.generatedFilesBaseDir = 'gen'

    generateProtoTasks {
        // all() returns the collection of all protoc tasks
        all().each { task ->
            // Here you can configure the task
        }

        ofSourceSet('main')

    }
}
Understanding Our First Generated Class
With our build.gradle prepared and our .proto file in place, if we do a build on our project now, we should see a
SensorDataOuterClass.java file generated within a new gen directory. Congratulations, you’ve compiled your first
Java class from a protobuf definition.
The Java code generated here has a few features we will be utilizing. The first is an inner Builder class, which allows us
to build a protobuf object based around our proto schema. The second is a method which in Java is named toByteArray().
In other languages (Dart for instance) this same method would be named something like toBuffer(). This method, as the
name suggests, transforms our object data into an array of bytes which can be sent over a communication channel of your choosing.
We will use the Builder class to build our SensorData object and then use toByteArray() to prepare our object for
transmission using our HTTP API.
Mapping Our Data
Now all that’s left is to create our mapping classes and our Javalin app!
Let’s start by creating two mapping classes in the mappers directory. We’ll use one for mapping primitive or very basic types that we’ll need to reuse frequently, and we’ll use one to map the return data for some of our REST endpoints. You can make your own pattern for this if you like. For our example, we’ll only be returning a single protobuf object, but in an actual API you might be returning a multitude of objects and you may need to generate a payload proto and map to it accordingly.
Here’s our BaseMapper. Note the only utility we’ve defined is a means to convert a nullable Timestamp from Java format
to Protobuf format. Alternatively we could extend java.sql.Timestamp and provide a toByteArray() method of our own.
package app.model.mappers;

import com.google.protobuf.Timestamp;

import java.time.Instant;
import java.util.Optional;

//Class for mapping standard library types, enums, etc to protobuf
public class BaseMapper {

    public static Optional<Timestamp> sqltimeToProtoTime(java.sql.Timestamp sqltime){
        if(sqltime != null){
            Instant instant = sqltime.toInstant();
            return Optional.of(Timestamp.newBuilder().setSeconds(instant.getEpochSecond()).setNanos(instant.getNano()).build());
        }
        return Optional.empty();
    }

    public static java.sql.Timestamp protoTimetoSQLTime(Timestamp tstamp){
        return java.sql.Timestamp.from(Instant.ofEpochSecond(tstamp.getSeconds(), tstamp.getNanos()));
    }

}
Great! Now that we have everything we need, let’s hop back over to our SensorData.java class for just a moment and add a method to convert the POJO into its PROTO equivalent. Take note that we must consider null safety because some of our proto’s fields can have null values.
Go ahead and add the following code to the end of the POJO. You’ll receive a warning that you need to import your generated Java class and the SQL timestamp method we just defined. Make sure you do that!
public SensorDataOuterClass.SensorData toBuffer() {
    SensorDataOuterClass.SensorData.Builder builder = SensorDataOuterClass.SensorData.newBuilder();

    // Set all non-nullable values first
    builder.addAllFluxCapacitorReadings(fluxCapacitorReadings)
            .setDestinationYear(destinationYear)
            .setSafetyBeltsOn(safetyBeltsOn);

    // Demonstrates using Java Optional for proto optionals, in this case lastCheckIn is optional in our proto
    // therefore we should check that lastCheckIn is not null prior to setting the lastCheckIn value on our proto object
    sqltimeToProtoTime(lastCheckIn).ifPresent(builder::setLastCheckIn);

    // Demonstrates null string check for proto optionals, in this case make and model can be null in our proto
    // so it can be assumed it could also be null in our datastore, thus we should check before setting it with our builder.
    if(makeAndModel != null){ builder.setMakeAndModel(makeAndModel); }

    return builder.build();
}
Note: In the sample code on GitHub, this toBuffer() method is declared in an interface and all of our POJO’s implement this interface.
And here is our RouteMapper, which will handle providing the return data for a GET endpoint in our Javalin app.
package app.model.mappers;


import app.model.objects.SensorData;

public class RouteMapper {

    public static byte[] getSensorDataResponse(SensorData data){
        return data.toBuffer().toByteArray();
    }

}
Create the Javalin App and Endpoints
Lastly, we’ll create two endpoints, one which will serve our FakeDao data over protobuf and one that will serve the same data over JSON.
We’ll call this class MyJavalinRunner and put it in the app directory.
package app;

import app.model.dao.FakeDao;
import app.model.objects.SensorData;
import io.javalin.Javalin;
import io.javalin.core.JavalinConfig;
import io.javalin.http.Handler;

import static app.model.mappers.RouteMapper.getSensorDataResponse;

public class MyJavalinRunner {

    public static void main(String[] args) {

        Javalin app = Javalin.create(JavalinConfig::enableCorsForAllOrigins).start();

        app.get("/pbuf", handleServeProtobuf);
        app.get("/json", handleServeJSON);

        app.exception(Exception.class, (e, ctx) -> {
            e.printStackTrace();
            ctx.status(500);
        });

    }

    public static Handler handleServeProtobuf = ctx -> {
        // Here's where you'd get your SensorData from your DB or device, etc.
        FakeDao dao = new FakeDao();
        SensorData sData = dao.getSensorDataFromVehicleDB();

        ctx.status(200);
        ctx.contentType("application/x-protobuf");
        ctx.result(getSensorDataResponse(sData));
    };

    public static Handler handleServeJSON = ctx -> {
        // Here's where you'd get your SensorData from your DB or device, etc.
        FakeDao dao = new FakeDao();
        SensorData sData = dao.getSensorDataFromVehicleDB();

        ctx.status(200);
        ctx.json(sData);
    };

}
That should do it, go ahead and click RUN!
Comparing the JSON and Protobuf Responses
That wasn’t so bad. Now that our app is running, let’s see what all the fuss is about with this protobuf stuff!
Let’s start by loading up a REST API Client. My personal favorite is Insomnia because it has support for HTTP2 in addition to a bunch of other cool features.
We’ll leave out the set-up and just skip straight to the part where we make a request to our server.
Let’s start with the JSON endpoint. We’ll do a GET request to http://localhost:8080/json
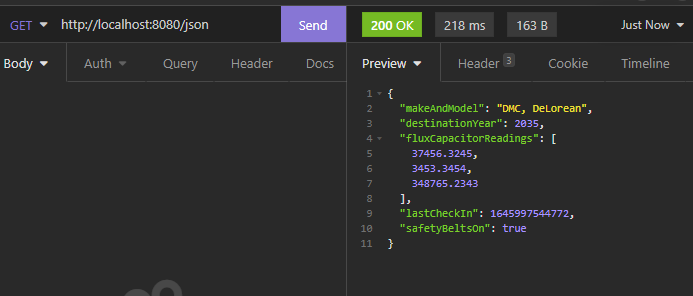
218 milliseconds and 163 bytes. Not bad!
Now let’s hit the protobuf endpoint and see what we get!
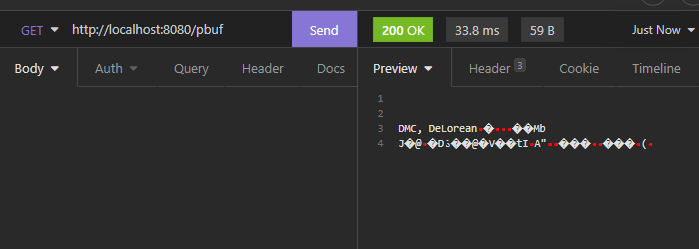
33.8 milliseconds and 59 bytes! Wow!
That’s a bit over 6 times faster and roughly 1/3 the size of our JSON response!
Conclusion
That’s it, you now have a basic understanding of protobuf and how it can be used within the context of a RESTful API.
Further Exploration
We now know protobuf is capable of providing a much smaller footprint than regular JSON but here’s where things get complicated. What if our JSON payloads were compressed? With modern compression like Brotli, it’s possible that we could shrink our JSON string-based payloads simply and efficiently.
Examining how compression affects response times and payload sizes is outside the scope of this tutorial but could be useful in making a decision about how to serialize data in your applications. For some light reading and some basic protobuf vs JSON benchmarks, check out this article.
Opinion: The big advantages of protobuf are that it can send typed data, and as such often sends data in the smallest and thus most efficient format. JSON sends everything as a string. Strings (assuming UTF-8) cost 8 bits per char. This might not seem like a big deal, but if your data isn’t primarily strings, the size cost of strings can quickly add up. The disadvantages of protobuf are that the data payload is binary and the implementation of protobuf involves compiling based on schema files (our .proto file in this tutorial), both of which make supporting and debugging code a little harder. Additionally, there are no widely used automatic serialization and deserialization tools for protobuf like there are with JSON. This sort of code must be written manually.