Introduction
In this tutorial, we will learn how to use mTLS to secure our application.
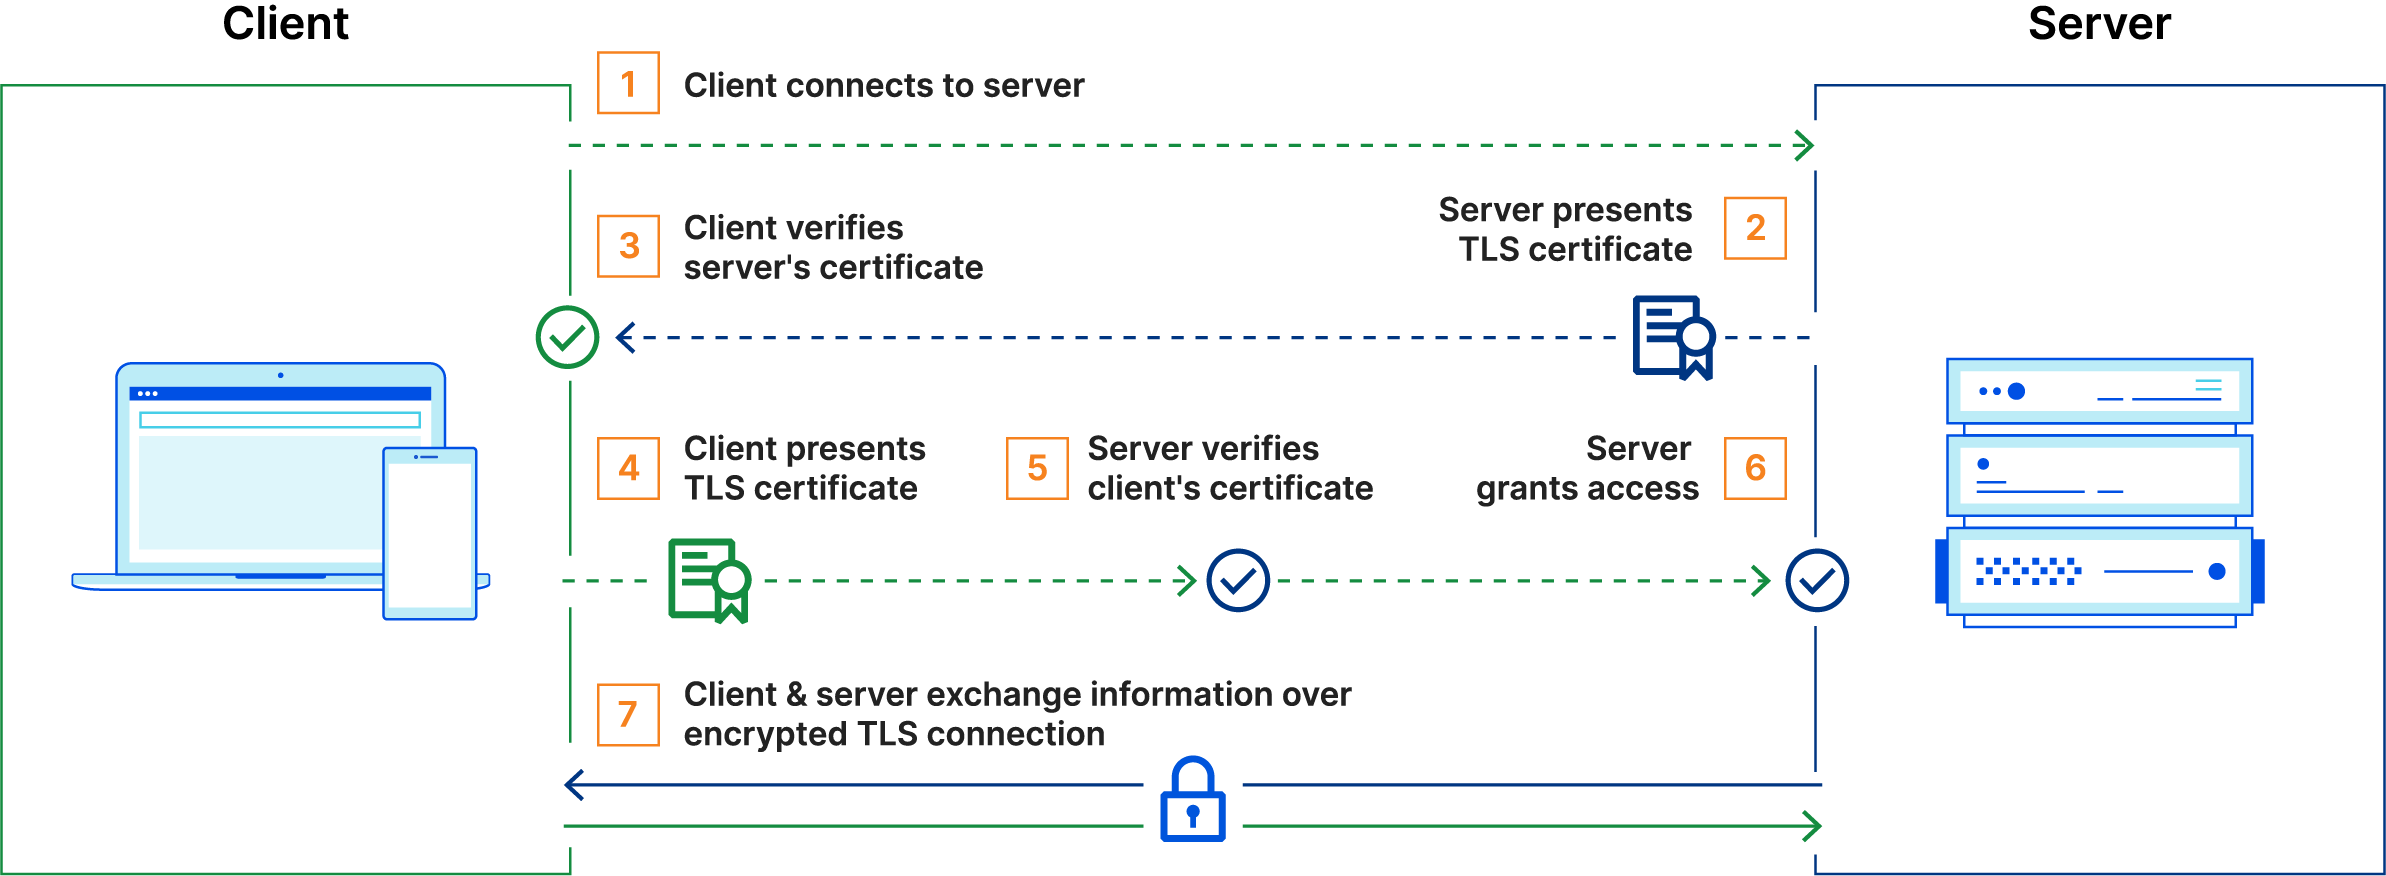
mTLS stands for mutual TLS. It is a method for mutual authentication between a client and a server. In this method, the client will present a certificate to the server and the server will present a certificate to the client. Both the client and the server will verify the certificates presented by the other party. If the certificates are not valid, the connection will be rejected.
This is usually used to secure internal applications that are used by trusted clients. For example, you could use mTLS to secure an internal API that is used by your mobile application. Microservices and Kubernetes are also good candidates for mTLS.
More information about mTLS can be found in this excellent article: What is Mutual TLS (mTLS)? by Cloudflare.
What will we need?
To follow this tutorial, you will need:
- A Javalin application, if you don’t have one yet, you can follow the maven tutorial or the gradle tutorial.
- A private certificate authority (CA) that will issue the certificates for your applications. You can use any 3rd party software to generate the certificates, such as OpenSSL or Keytool. We won’t be covering this in this tutorial, but you can check this tutorial for more information.
Once you have it set up, you’ll need:
- A certificate for your application. This certificate will be used by the server to authenticate itself to the client.
- A certificate for your client. This certificate will be used by the client to authenticate itself to the server.
Securing Javalin with mTLS
In order to secure our Javalin application with mTLS, we will need to do the following:
1. Obtain the certificates
As mentioned before, we won’t be covering how to generate the certificates in this tutorial, please refer to the What will we need? section for more information.
Let’s assume that we have our servers certificate and its private key in the following PEM encoded files:
/etc/ssl/server.crt/etc/ssl/server.key
Our client will also have its own certificate and private key in the following PEM encoded files:
/etc/ssl/client.crt/etc/ssl/client.key
And finally, we will need the CA certificate that was used to sign the server and client certificates in the following PEM encoded file:
/etc/ssl/ca.crt
We will be trusting the CA certificate in our application, the server will accept any certificate signed by the CA. So, if we want to add a new client to our application, we will only need to sign its certificate with the CA and it will be able to connect to the server.
2. Add the Javalin SSL dependency
Once we have our certificate and its private key, to secure our Javalin application with SSL, we will use the Javalin SSL plugin. The plugin is available in maven central. To add the plugin to our project, we need to add the following dependency:
- Maven
- Gradle
- SBT
- Grape
- Leiningen
- Buildr
- Ivy
<dependency>
    <groupId>io.javalin.community.ssl</groupId>
    <artifactId>ssl-plugin</artifactId>
    <version>6.7.0</version>
</dependency>
Not familiar with Maven? Read our Maven tutorial.
implementation("io.javalin.community.ssl:ssl-plugin:6.7.0")
Not familiar with Gradle? Read our Gradle tutorial.
libraryDependencies += "io.javalin.community.ssl" % "ssl-plugin" % "6.7.0"
@Grab(group='io.javalin.community.ssl', module='ssl-plugin', version='6.7.0')
[io.javalin.community.ssl/ssl-plugin "6.7.0"]
'io.javalin.community.ssl:ssl-plugin:jar:6.7.0'
<dependency org="io.javalin.community.ssl" name="ssl-plugin" rev="6.7.0" />
3. Configure the Javalin SSL plugin
To secure our Javalin application with mTLS, we just need to load the certificates and private keys into the SSL plugin, and register it with our Javalin application.
- Java
- Kotlin
SslPlugin plugin = new SslPlugin(conf -> {
    conf.insecure = false; // Disable HTTP

    // Server certificate and private key
    conf.pemFromPath("/etc/ssl/server.crt", "/etc/ssl/server.key");

    conf.withTrustConfig(trustConfig -> {
        // CA certificate
        trustConfig.certificateFromPath("/etc/ssl/ca.crt");
    });
});

Javalin.create(javalinConfig -> {
    javalinConfig.plugins.register(plugin);
}).start();
val plugin = SslPlugin { conf ->
    conf.insecure = false // Disable HTTP

    // Server certificate and private key
    conf.pemFromPath("/etc/ssl/certificate.pem", "/etc/ssl/privateKey.pem")

    conf.withTrustConfig { trustConfig ->
        // CA certificate
        trustConfig.certificateFromPath("/etc/ssl/ca.crt")
    }
}

Javalin.create { javalinConfig ->
    javalinConfig.plugins.register(plugin)
}.start()
As easy as that! Now, our Javalin application is secured with mTLS on the default port, 443.
4. Testing the application
To test our application, a client that supports mTLS is required. We will use Insomnia, a REST client with a nice GUI.
If we try to make a request to our application, we will get an error, because we are not sending any client certificate.
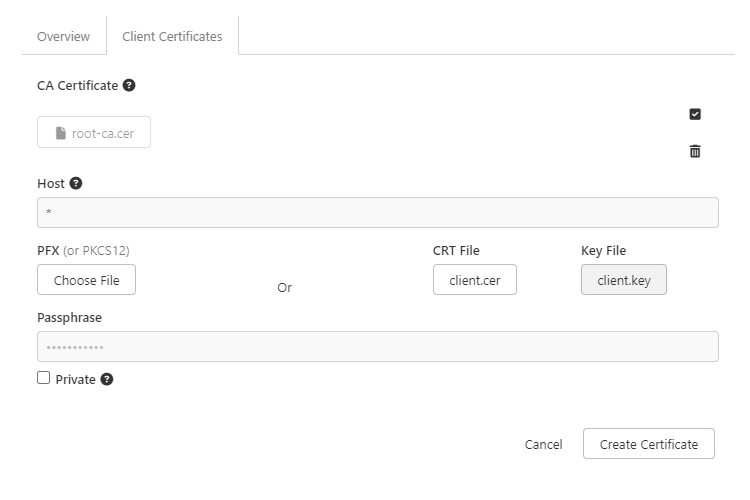
To import a new certificate, click Document Settings or Collection Settings then the Client Certificates tab. Here we will first add the CA certificate, in the CA Certificate section.
Once you click New Certificate in the Client Certificates tab, you will be prompted to fill out the following information:
- Host: for our purposes, we will use
*to match any host - PFX: leave this empty
- CRT File + Key File: choose the client certificate and corresponding private key files
- Passphrase: the passphrase for the private key, if any
It should look like this:
After you add the certificate, you will be able to use the client certificate in any request as you would normally do.

Conclusion
In this tutorial, we have learned how to secure a Javalin application with mTLS. We have seen where we can learn to generate a CA certificate, and how to sign client certificates with it. We have also seen how to configure the Javalin SSL plugin to use the certificates and private keys, and how to test the application with Insomnia.
For further configuration options, and different certificate formats, please refer to the Javalin SSL plugin documentation.