Introduction
Since browsers started to enforce the use of HTTPS, it has become a necessity to secure your web application with SSL. In this tutorial, we will learn how to secure our Javalin application with SSL and how SSL works.
The first step to secure your application is to use HTTPS. HTTPS is the secure version of HTTP. It is the same protocol, but it uses SSL/TLS to encrypt the communication between the client and the server. The client and the server will use a secure channel to exchange information. This secure channel is established using a cryptographic protocol called TLS (Transport Layer Security). TLS is the successor of SSL (Secure Sockets Layer). The name change was made because of the acquisition of SSL by Netscape. Nowadays, SSL is used as a generic term to refer to the TLS protocol and its predecessors.
How does HTTPS work?
The following diagram shows the steps that are followed to establish a secure connection between a client and a server.
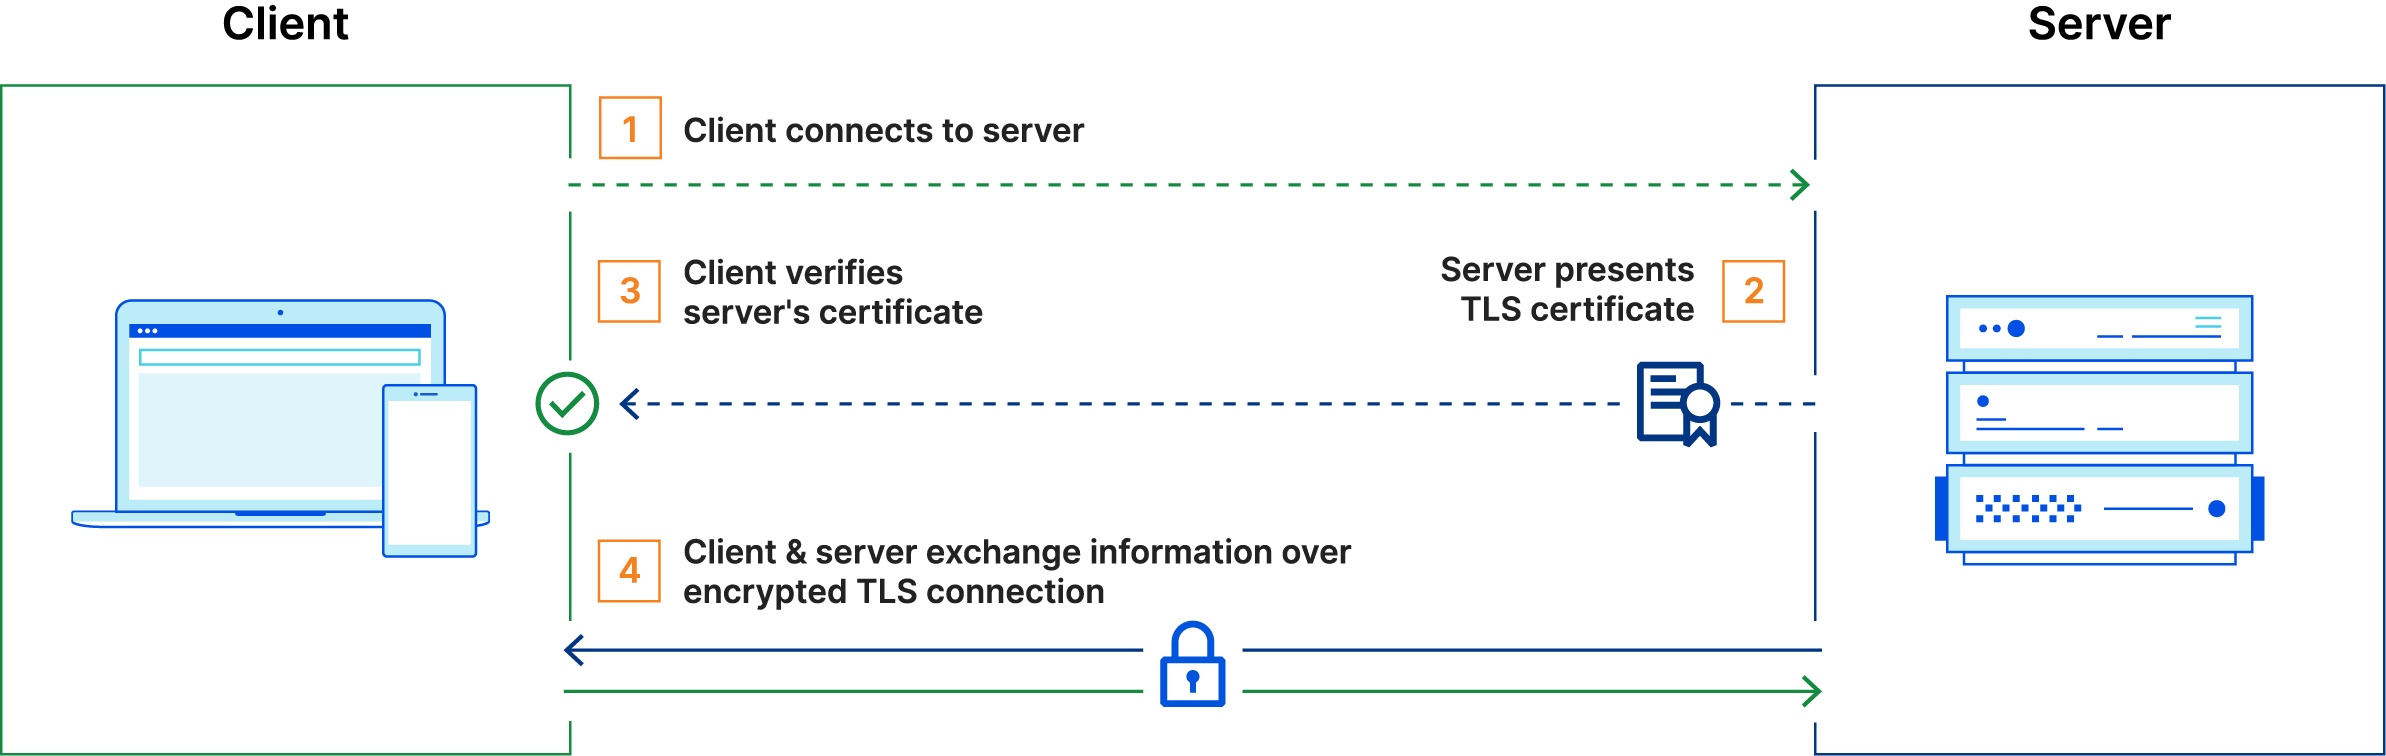
The certificate’s public key presented by the server is used to securely exchange a symmetric key to use during our connection.
However, the client needs to verify that the server is who it says it is. To do this, the client needs to verify the server’s certificate. The client will check if the certificate is valid and if it was issued by a trusted Certificate Authority (CA). If the certificate is not valid or it was not issued by a trusted CA, the client will reject the connection.
What is a Certificate Authority (CA)?
The Certificate Authority (CA) is an entity that issues digital certificates. The CA verifies the identity of the server and signs the certificate with its private key. The certificate contains the public key of the server and some metadata about the server, such as the common name, the organization, the country, and the expiration date. The client will use this information to decide if it trusts the server.
Let’s Encrypt is a Certificate Authority that provides free SSL certificates. Managing this certificates can be a bit tricky. This is outside of the scope of this tutorial. However, you can find more information about Let’s Encrypt in the Let’s Encrypt documentation.
What is a Self-Signed Certificate?
A self-signed certificate is a certificate that is signed by the same entity that created it. The certificate is not signed by a trusted CA. A client will not trust the certificate because it is not signed by a trusted CA. However, the client can trust the certificate if it is manually added to the list of trusted certificates in the client’s trust store.
Why would you use a Self-Signed Certificate?
There are several reasons why you would use a self-signed certificate. For example, you could use a self-signed certificate for testing purposes. You could also use a self-signed certificate if you are developing an internal application that will be used only by trusted clients. In this case, you can add the self-signed certificate to the client’s trust store.
When should you not use a Self-Signed Certificate?
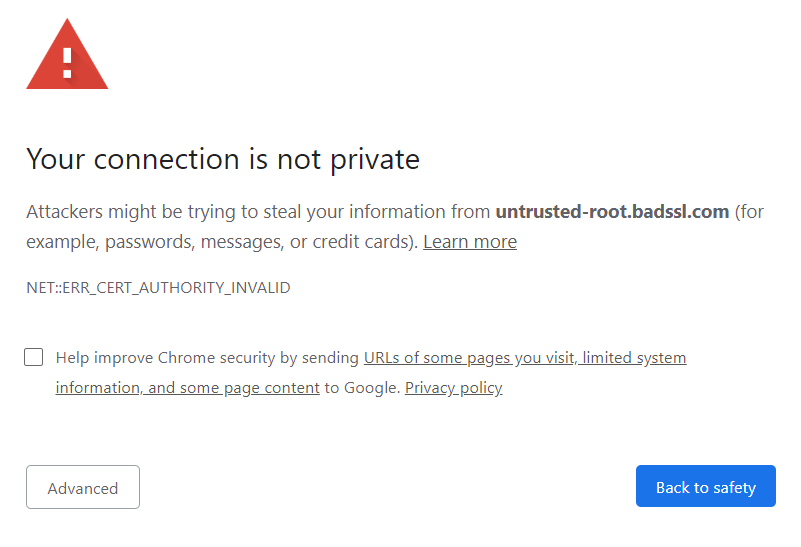
When you are developing a web application that will be used by the general public, you should not use a self-signed certificate. The reason is that the client will not trust the certificate because it is not signed by a trusted CA. If the client does not trust the certificate, the connection will be rejected and a security warning will be displayed in the browser:
Should I enable SSL in my Javalin application?
In most cases you won’t be securing your application with SSL, this responsibility will be delegated to a reverse proxy, this is a server that sits in front of your application and forwards requests to it, like this:
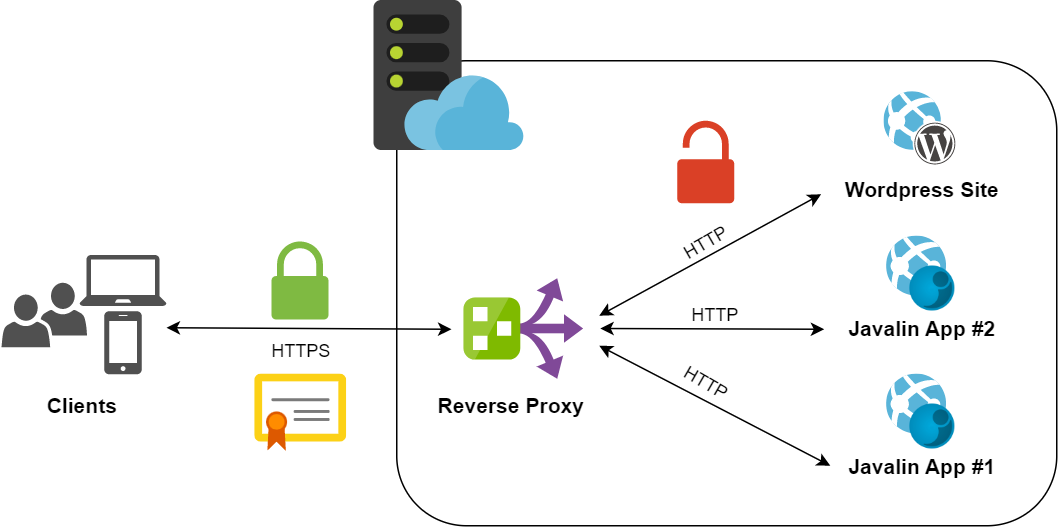
This approach provides a lot of benefits, such as:
- Removing any SSL related code from your application
- The reverse proxy (and the certificate) can be shared by multiple applications
- SSL termination is done at the reverse proxy, which means that the application will not have to deal with the overhead of encrypting and decrypting the data.
This is especially useful if you are running your application in a containerized environment, where you can easily spin up multiple instances of your application and share the same reverse proxy.
However, this won’t work for all use cases, forwarding traffic using http is only a good idea if you are running your applications in the same server, if you are running your application in a different server, you should encrypt the traffic between the reverse proxy and the application.
Some of the most popular reverse proxies are:
-
Nginx, a popular open source reverse proxy that can be used as a load balancer. You will need to configure Nginx to use SSL and to forward the traffic to your application, you can find more information about this in the Nginx documentation. You will also need to obtain a certificate for your domain, if you don’t have one, you can use Let’s Encrypt and the Certbot tool to obtain a free certificate, you can find more information about this in the Certbot documentation.
-
Caddy, a newer reverse proxy written in Go that is easy to configure and that can be used as a load balancer. You can find more information about Caddy in the Caddy documentation. Configuring Caddy and obtaining a certificate for your domain is really easy, you can find more information about it here.
Securing Javalin with SSL
If after everything we have seen, you still want to secure your Javalin application with SSL, you can follow the steps in this tutorial. In this tutorial, we will use a self-signed certificate to secure our application. However, you can use a certificate issued by a trusted CA if you want just skip to step 2.
1. Obtain a certificate
The first step is to obtain a certificate. You can obtain a certificate from a trusted CA or you can generate a self-signed certificate. In this tutorial, we will use a dummy self-signed certificate. Once we have a certificate and its private key, we can secure our Javalin application with SSL.
Supported certificate formats are PKCS#12 (.p12) and PKCS#8 (.pem) and Java KeyStore (.jks).
Generating a self-signed certificate
Java KeyStore files might sound like a good idea, but they are not. They are only supported by Java and they are not easy to use. You can find more information about Java KeyStore files in the Java documentation.
In this tutorial, we will use the PKCS#8 format (.pem), since it is used preferentially by open-source software and the default from Let’s Encrypt.
To generate our certificate we will use the OpenSSL tool. It is recommended to install openssl using your package manager, for example, in Ubuntu you can install it using the following command:
sudo apt install openssl
On windows, things are a bit more complicated, you can find more information about installing OpenSSL in the following StackOverflow answers.
Once you have OpenSSL installed, you can generate a self-signed certificate using the following command:
openssl req -x509 -newkey rsa:4096 -keyout key.pem -out cert.pem -days 365
You will be asked to provide some information about the certificate, such as the country, the state, the city, etc. You can leave this information blank if you want, it will be visible in the certificate, but it will not affect the functionality of the certificate.
Once you have generated the certificate, you should have two files: key.pem and cert.pem. These files contain the private key and the certificate respectively. Remember where you saved these files, you will need them later.
2. Add the Javalin SSL dependency
Once we have our certificate and its private key, to secure our Javalin application with SSL, we will use the Javalin SSL plugin. The plugin is available in maven central. To add the plugin to our project, we need to add the following dependency:
- Maven
- Gradle
- SBT
- Grape
- Leiningen
- Buildr
- Ivy
<dependency>
    <groupId>io.javalin.community.ssl</groupId>
    <artifactId>ssl-plugin</artifactId>
    <version>6.7.0</version>
</dependency>
Not familiar with Maven? Read our Maven tutorial.
implementation("io.javalin.community.ssl:ssl-plugin:6.7.0")
Not familiar with Gradle? Read our Gradle tutorial.
libraryDependencies += "io.javalin.community.ssl" % "ssl-plugin" % "6.7.0"
@Grab(group='io.javalin.community.ssl', module='ssl-plugin', version='6.7.0')
[io.javalin.community.ssl/ssl-plugin "6.7.0"]
'io.javalin.community.ssl:ssl-plugin:jar:6.7.0'
<dependency org="io.javalin.community.ssl" name="ssl-plugin" rev="6.7.0" />
3. Configure the Javalin SSL plugin
Let’s assume that we have our certificate and its private key in the following files:
/etc/ssl/cert.pem/etc/ssl/key.pem
To secure our Javalin application with SSL, we need to configure the Javalin SSL plugin. We can do this by doing the following:
- Java
- Kotlin
SslPlugin plugin = new SslPlugin(conf -> {
    conf.pemFromPath("/etc/ssl/certificate.pem", "/etc/ssl/privateKey.pem");
});

Javalin.create(javalinConfig -> {
    javalinConfig.plugins.register(plugin);
}).start();
val plugin = SslPlugin { conf ->
    conf.pemFromPath("/etc/ssl/certificate.pem", "/etc/ssl/privateKey.pem")
}

Javalin.create { javalinConfig ->
    javalinConfig.plugins.register(plugin)
}.start()
As easy as that! Now, our Javalin application is secured with SSL on the default port 443 as well as on the default insecure port 80.
For further configuration options, please refer to the Javalin SSL plugin documentation.