In this tutorial you’ll learn how to create simple frontends with Javalin and Vue. The tutorial is quite extensive, and covers single-file components, routing, error handling, application layouts, access management (plus authentication), and state sharing between server and client.
The tutorial is a bit different from what I normally write, as it will be pretty opinionated. The background section gives a bit of insight as to how I’ve come up with the approach used in the tutorial, but if you’re just here to learn how to write simple frontends, you can skip ahead to setup section.
Background
I’ve been doing web development for roughly ten years. For server side rendering, I started with pure HTML (framesets!), then PHP, JSP, JSTL, Twirl (Scala) and finally, Velocity templates (Java). On the frontend I’ve used jQuery/Zepto, then Knockout, Angular, Meteor, and finally, Vue. For styling I’ve used Less, SASS (SCSS), and finally CSS variables. For building I’ve used Bower, NPM and Yarn, Grunt and Gulp, and I’ve configured a total of one Webpack project.
Frontend has come a long way in the last ten years, and declarative/reactive view libraries are much nicer to work with than the DOM manipulation mess of the past.
But modern frontend architecture is also often hugely (and unnecessarily) complex. I won’t go into a rant about this, as I won’t move any people in either camp, but this tutorial will show an alternative approach for creating clean and modern frontends in pure Vue, without most of the complexity that would normally follow along with it. There will be no Node, NPM, or Webpack, no state management, reducers, or sagas. No rehydration, no tree shaking, no code splitting, or endless transitive dependencies. No boilerplate or plumbing code of any kind.
Just business logic.
Setup
Our backend will be Kotlin, and we’ll be using Maven to build.
We need to bring in Javalin (web server framework).
We’ll also add Vue (view library) for our frontend:
<dependency>
    <groupId>io.javalin</groupId>
    <artifactId>javalin-bundle</artifactId>
    <version>6.7.0</version>
</dependency>
<dependency>
    <groupId>org.webjars.npm</groupId>
    <artifactId>vue</artifactId>
    <version>3.2.37</version>
</dependency>
Now that we have all our dependencies in order, we need to configure our web server.
Let’s create /src/main/kotlin/javalinvue/JavalinVueExampleApp.kt:
import io.javalin.Javalin

fun main() {
    val app = Javalin.create { config ->
        config.staticFiles.enableWebjars()
        config.vue.vueInstanceNameInJs = "app" // only required for Vue 3, is defined in layout.html
    }.start(7070)
}
We also need an HTML file to load our frontend dependencies and to initialize Vue.
Let’s create /src/main/resources/vue/layout.html:
<html>
  <head>
    <meta charset="utf8">
    <script src="/webjars/vue/3.2.37/dist/vue.global.prod.js"></script>
    <script>
      const app = Vue.createApp({});
    </script>
    @componentRegistration
  </head>
  <body>
  <main id="main-vue" v-cloak>
    @routeComponent
  </main>
  <script>
    app.mount("#main-vue");
  </script>
  </body>
</html>
There are two Javalin specific things here: @componentRegistration and @routeComponent.
Javalin’s Vue plugin will scan your /resources/vue folder and put all your Vue components
into @componentRegistration, similar to how libraries are loaded via <script> tags.
Javalin will also let you choose one component to mount based on the current URL,
this is the @routeComponent.
Hello World
Now that we have a layout file, let’s create /resources/vue/views/hello-world.vue:
<template id="hello-world">
  <h1 class="hello-world">Hello, World!</h1>
</template>
<script>
  app.component("hello-world", {template: "#hello-world"});
</script>
<style>
  .hello-world {
    color: goldenrod;
  }
</style>
We’re telling Vue that we want to register a hello-world component, and to use the template with the id hello-world.
We’re also giving the Hello, World! message a color. Notice how we have all HTML, JavaScript and CSS
for our component encapsulated in the same file.
To display our component to the user, we need to tell Javalin when to show it. Let’s expand our web server with a new route:
import io.javalin.Javalin
import io.javalin.vue.VueComponent

fun main() {

    val app = Javalin.create { config ->
        config.staticFiles.enableWebjars()
        config.vue.vueInstanceNameInJs = "app"
    }.start(7070)

    app.get("/", VueComponent("hello-world"))
}
The @routeComponent that we added in layout.html earlier will be replaced by the String inside of VueComponent.
This means a call to / will load the layout and display our <hello-world></hello-world> component.
Restart the server, go to http://localhost:7070/, and you’ll see Hello, World! in a nice goldenrod color.
Note that you don’t have to restart the server when making changes to .vue files,
Javalin will pick up on those automatically.
The reason we needed to restart now was because we added a new route in the main function.
Routing and error handling
Now that we know how to create components, let’s look at a very common scenario: creating an admin interface. Our admin interface should be able to display an overview of users, and also additional details for one specific user. This will require two views, and we should probably also include a “Page not found” (404) page.
Let’s change the server by adding the following lines:
app.get("/users", VueComponent("user-overview"))
app.get("/users/{user-id}", VueComponent("user-profile"))
app.error(HttpStatus.NOT_FOUND, "html", VueComponent("not-found"))

app.get("/api/users", UserController::getAll)
app.get("/api/users/{user-id}", UserController::getOne)
We’ve referenced UserController in the previous snippet, but that doesn’t exist yet.
So, let’s create /src/main/kotlin/javalinvue/UserController.kt:
import io.javalin.http.Context
import io.javalin.http.NotFoundResponse

data class User(val id: String, val name: String, val email: String, val userDetails: UserDetails?)
data class UserDetails(val dateOfBirth: String, val salary: String)

val users = setOf(
    User(id = "1", name = "John", email = "[email protected]", userDetails = UserDetails("21.02.1964", "2773 JB")),
    User(id = "2", name = "Mary", email = "[email protected]", userDetails = UserDetails("12.05.1994", "1222 JB")),
    User(id = "3", name = "Dave", email = "[email protected]", userDetails = UserDetails("01.05.1984", "1833 JB")),
    User(id = "4", name = "Jane", email = "[email protected]", userDetails = UserDetails("30.12.1989", "1532 JB")),
    User(id = "5", name = "Eric", email = "[email protected]", userDetails = UserDetails("14.09.1973", "2131 JB")),
    User(id = "6", name = "Gina", email = "[email protected]", userDetails = UserDetails("16.08.1977", "1982 JB")),
    User(id = "7", name = "Ryan", email = "[email protected]", userDetails = UserDetails("07.11.1988", "1638 JB")),
    User(id = "8", name = "Judy", email = "[email protected]", userDetails = UserDetails("05.01.1959", "2983 JB"))
)

object UserController {

    fun getAll(ctx: Context) {
        ctx.json(users.map { it.copy(userDetails = null) }) // remove sensitive information
    }

    fun getOne(ctx: Context) {
        val user = users.find { it.id == ctx.pathParam("user-id") } ?: throw NotFoundResponse()
        ctx.json(user)
    }

}
This completes our backend, let’s move on to the frontend. We want three views (user-overview, user-profile, and not-found), so
we should create three separate files in /src/main/resources/vue/views.
Let’s create /src/main/resources/vue/views/user-overview.vue first:
<template id="user-overview">
  <div>
    <ul class="user-overview-list">
      <li v-for="user in users">
        <a :href="`/users/${user.id}`">{{user.name}} ({{user.email}})</a>
      </li>
    </ul>
  </div>
</template>
<script>
  app.component("user-overview", {
    template: "#user-overview",
    data: () => ({
      users: [],
    }),
    created() {
      fetch("/api/users")
        .then(res => res.json())
        .then(res => this.users = res)
        .catch(() => alert("Error while fetching users"));
    }
  });
</script>
<style>
  ul.user-overview-list {
    padding: 0;
    list-style: none;
  }
  ul.user-overview-list a {
    display: block;
    padding: 16px;
    border-bottom: 1px solid #ddd;
  }
  ul.user-overview-list a:hover {
    background: #00000010;
  }
</style>
It’s a simple component which performs one GET request to the server to fetch the list of users, then sets the component state. Vue loops through the users and creates a list of links that we can click to view additional information for one user. We’ve also included a few CSS rules to pretty things up.
Open http://localhost:7070/users/ to view the list of users. If you click on one, a blank page will show.
Let’s fix this by creating /src/main/resources/vue/views/user-profile.vue:
<template id="user-profile">
  <div>
    <dl v-if="user">
      <dt>User ID</dt>
      <dd>{{user.id}}</dd>
      <dt>Name</dt>
      <dd>{{user.name}}</dd>
      <dt>Email</dt>
      <dd>{{user.email}}</dd>
      <dt>Birthday</dt>
      <dd>{{user.userDetails.dateOfBirth}}</dd>
      <dt>Salary</dt>
      <dd>{{user.userDetails.salary}}</dd>
    </ul>
  </div>
</template>
<script>
  app.component("user-profile", {
    template: "#user-profile",
    data: () => ({
      user: null,
    }),
    created() {
      const userId = this.$javalin.pathParams["user-id"];
      fetch(`/api/users/${userId}`)
        .then(res => res.json())
        .then(res => this.user = res)
        .catch(() => alert("Error while fetching user"));
    }
  });
</script>
This is pretty similar to our user-overview, but since this is a dynamic route,
we have to ask our router what the current user-id is.
JavalinVue includes path parameters on $javalin by default
(it also has an optional state parameter we will look at later).
Let’s finish up our views with /src/main/resources/vue/views/not-found.vue:
<template id="not-found">
  <h1>Page not found (error 404)</h1>
</template>
<script>
  app.component("not-found", {template: "#not-found"});
</script>
Great, we have all our views ready! …but they don’t look very consistent.
While not strictly related to JavalinVue, let’s add /src/main/resources/vue/components/app-frame.vue:
<template id="app-frame">
  <div class="app-frame">
    <header>
      <span>JavalinVue demo app</span>
    </header>
    <slot></slot>
  </div>
</template>
<script>
  app.component("app-frame", {template: "#app-frame"});
</script>
<style>
  .app-frame > header {
    padding: 20px;
    background: #b6e2ff;
    font-size: 20px;
    display: flex;
    justify-content: space-between;
    align-items: center;
  }
</style>
You can use this app-frame by adding <app-frame>...</app-frame> as the first child of your component.
The <slot></slot> element will be replaced by the content of the current page.
Here is an example showing the 404 page using the app-frame:
<template id="not-found">
  <app-frame>
    <h1>Page not found (error 404)</h1>
  </app-frame>
</template>
<script>
  app.component("not-found", {template: "#not-found"});
</script>
We could have put this frame in layout.html, but creating a dedicated component for it
gives us the option to have different styles, and keeps the main layout clean.
Now that both the frontend and backend are done, it’s time to make things more complicated by adding access management to the mix.
Access Management
Access management in Javalin is handled by a combination of before-filters and route-roles. It’s up to the developer to determine if a request is valid. We will be securing our application using basic-auth for simplicity, but you can use any technique and identity provider you want.
First we need to define roles. Some parts of the app should be accessible to everyone (the user-overview and the 404 page), while
other parts should only be available if you log in (the user-profile).
Two roles should be enough: ANYONE and LOGGED_IN. We add those roles to the endpoints
(both for the views and the APIs, and create a filter:
import io.javalin.Javalin
import io.javalin.apibuilder.ApiBuilder.get
import io.javalin.security.RouteRole
import io.javalin.http.Header
import io.javalin.http.Context
import io.javalin.http.HttpStatus
import io.javalin.http.UnauthorizedResponse
import io.javalin.vue.VueComponent

enum class Role : RouteRole { ANYONE, LOGGED_IN }

fun main() {

    val app = Javalin.create { config ->
        config.staticFiles.enableWebjars()
        config.vue.apply {
            stateFunction = { ctx -> mapOf("currentUser" to ctx.currentUser()) }
            vueInstanceNameInJs = "app"
        }
        config.router.mount {
            it.beforeMatched { ctx ->
                if (Role.LOGGED_IN in ctx.routeRoles() && ctx.currentUser() == null) {
                    ctx.header(Header.WWW_AUTHENTICATE, "Basic")
                    throw UnauthorizedResponse()
                }
            }
        }.apiBuilder { // frontend routes
            get("/", VueComponent("hello-world"), Role.ANYONE)
            get("/users", VueComponent("user-overview"), Role.ANYONE)
            get("/users/{user-id}", VueComponent("user-profile"), Role.LOGGED_IN)
        }.apiBuilder { // api routes
            get("/api/users", UserController::getAll, Role.ANYONE)
            get("/api/users/{user-id}", UserController::getOne, Role.LOGGED_IN)
        }
    }.apply {
        error(HttpStatus.NOT_FOUND, "html", VueComponent("not-found"))
    }.start(7070)

}

private fun Context.currentUser() = this.basicAuthCredentials()?.username
This is just an example, our authentication isn’t exactly secure. As long as the user enters anything in the basic-auth username field, we log the user in. We completely ignore the password.
Server Side State
Now that we can log users in, it would be nice if the client knew the current user. Our server knows, so we need to transfer this knowledge somehow. This can be solved by setting a JavalinVue state function:
config.vue.stateFunction = { ctx -> mapOf("currentUser" to currentUser(ctx)) }
This line of code sets a function that will run for every VueComponent, so all components will now
have access to the current user (if there is one). Since basic-auth works per directory, the frame will only
show the current user for http://localhost:7070/users/ (the user-overview) and its subpaths (the individual profiles).
Let’s add it to app-frame.vue:
<template id="app-frame">
  <div class="app-frame">
    <header>
      <span>JavalinVue demo app</span>
      <span v-if="$javalin.state.currentUser">Current user: '{{$javalin.state.currentUser}}'</span>
    </header>
    <slot></slot>
  </div>
</template>
Conclusion
We’ve created a fully working (but pretty limited) admin interface with only a few files.
JavalinVueExampleApp.ktcontains the server config (routes, error handlers, access management)UserController.ktcontains the list of fake users, and methods to get them (getAll, getOne)layout.htmlloads the frontend dependencies and initializes Vueapp-frame.vuehas a header and some global styling which is included in all componentsuser-overview.vuedisplays a list of usersuser-profile.vuedisplays additional details for one user (requires login)not-found.vuedisplays a 404 error pagepom.xmlcontains all our dependencies
Since our frontend dependencies are prepacked WebJars, we don’t need NPM, and we don’t need to manage any frontend libraries manually. The project structure is very clean:
javalinvue-example
├───src
│   └─── main
│       └───kotlin
│           ├───javalinvue
│           │   ├───UserController.kt
│           │   └───Main.kt
│           └───resources
│               ├───components
│               │   └───app-frame.vue
│               ├───components
│               │   ├───not-found.vue
│               │   ├───user-overview.vue
│               │   └───user-profile.vue
│               └───layout.html
└───pom.xml
That’s about it. The Afterword contains a bit more discussion about this technique, but similarly to the Background section you can skip it if you’re not that interested. Thanks for reading!
Afterword
The architecture described in this tutorial has a lot of the benefits of a modern frontend. We have full client side rendering, no DOM manipulation, and we’re able to use Vue fully (we even have single-file components). We don’t have any client side routing though. We have one Vue instance per page (per server side route), which makes state management a lot easier. Each view is responsible for its own state, and that’s it. The app is built from scratch every time the user navigates on the website. Shared state (signed-in-user, current-theme, etc) can be set on server side, and is included in all views.
We’re missing out on a few nice things. We can’t hot reload the content of a component or inject new styles, we have to manually refresh the page to see changes. Changes are picked up instantly though, so a refresh typically takes ~10ms.
I’m running a couple of apps with this setup in production. The biggest one is a customer-portal with 30 components and 25 views (pages), and the total weight of all the components is only 20kb (100kb before GZIP). It’s been running for a year, and I’ve been waiting for issues and flaws to present themselves, but I haven’t seen any yet.
Update, October 2022: The app has been running for four years without
any issues. It’s now using the JavalinVue.optimizeDependencies config option, which
is enabled by default for Javalin 4+. This brings the average request size down to about 8kb gzipped.
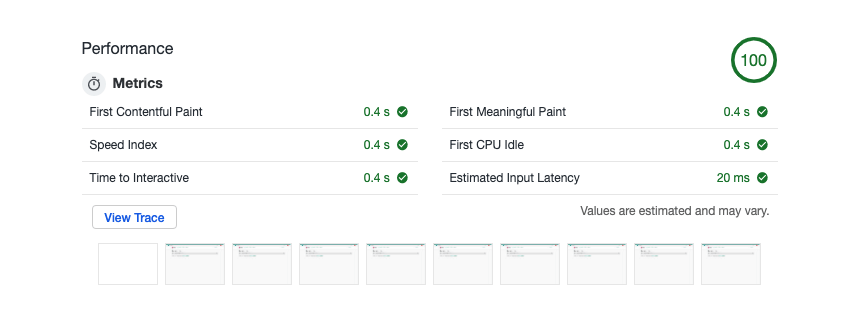
Performance is pretty good. The app loads fast and never flickers. Below you see the Chrome audit results for the 30 component + 25 view app that I mentioned earlier:
Pros and Cons
Pros
- Minimal prerequisites - a backend developer can be productive within minutes by just reading the Vue docs. No knowledge of the current JavaScript ecosystem is required.
- No boilerplate
- Single file components
- No complex build pipelines or transitive dependencies
- No state management required
- Good performance
- Can easily copy-paste from docs (Vue docs use CDN in their examples, while most projects use Webpack)
- Server side routing
Cons
- Can’t run unit tests for components
- No transpiling (can’t use the latest JS features without code breaking in old browsers)
- No hot-reload or style injection
- You miss out on a lot of the JS ecosystem (could also be considered a pro)
- Need a Kotlin/Java server for your frontend
- Tight coupling between server and client
I’ve created an issue on GitHub where you can post your pros/cons, or general comments on the tutorial.
You can add all frontend dependencies as Webjars, which can be built directly from NPM. If something is available on NPM, it’s also available as a Webjar, but as a prebuilt dist version (it has no dependencies).